“Java Web: 用户登陆功能的实现”的版本间的差异
来自CloudWiki
(创建页面,内容为“servlet+jsp+java实现Web 应用 用java来构建一个web应用是特别容易的事情,jsp和php很像,可以嵌套在html中。程序的结构很简单…”) |
(→创建servlet) |
||
| (未显示同一用户的3个中间版本) | |||
| 第2行: | 第2行: | ||
用java来构建一个web应用是特别容易的事情,jsp和php很像,可以嵌套在html中。程序的结构很简单,也很清楚,本文主要记录下大概的开发过程和环境的搭建。 | 用java来构建一个web应用是特别容易的事情,jsp和php很像,可以嵌套在html中。程序的结构很简单,也很清楚,本文主要记录下大概的开发过程和环境的搭建。 | ||
| − | |||
| − | |||
| − | |||
| − | |||
| − | |||
| − | |||
| − | |||
==开发过程== | ==开发过程== | ||
| 第15行: | 第8行: | ||
项目名称:test03 | 项目名称:test03 | ||
| − | === | + | ===创建一个登陆页面=== |
2.创建一个欢迎页面 | 2.创建一个欢迎页面 | ||
| − | 页面可以是jsp/ | + | 页面可以是jsp/html,我们用我们最熟悉的html页面 |
<nowiki> | <nowiki> | ||
<html> | <html> | ||
<head> | <head> | ||
| + | <meta http-equiv="Content-Type" content="text/html; charset=utf-8"/> | ||
| + | <script src="https://code.jquery.com/jquery-3.0.0.min.js"></script> | ||
<style type="text/css"> | <style type="text/css"> | ||
.layer2{width:400px; height:auto; padding:30px; margin:30px auto; background:#ddf; border-radius:8px;} | .layer2{width:400px; height:auto; padding:30px; margin:30px auto; background:#ddf; border-radius:8px;} | ||
| 第59行: | 第54行: | ||
</head> | </head> | ||
<body><div class="layer2"> | <body><div class="layer2"> | ||
| − | <form method=" | + | <form method="post" > |
<table id="login"> | <table id="login"> | ||
<caption>用户登录界面</caption> | <caption>用户登录界面</caption> | ||
<tr> | <tr> | ||
<td class="col1">用户名</td> | <td class="col1">用户名</td> | ||
| − | <td class="col2"><input type="text" name=" | + | <td class="col2"><input type="text" name="username"/></td> |
</tr> | </tr> | ||
<tr> | <tr> | ||
<td class="col1">密码</td> | <td class="col1">密码</td> | ||
| − | <td class="col2"><input type="password" name=" | + | <td class="col2"><input type="password" name="password" /></td> |
</tr> | </tr> | ||
<tr> | <tr> | ||
| − | <td colspan="2" class="col3"><input type="submit" value="提 交" class="bn"/> | + | <td colspan="2" class="col3"><input type="submit" value="提 交" class="bn" /> |
<input type="reset" value="取 消" class="bn" /></td> | <input type="reset" value="取 消" class="bn" /></td> | ||
| 第81行: | 第76行: | ||
</div> | </div> | ||
</body> | </body> | ||
| + | |||
</html></nowiki> | </html></nowiki> | ||
| + | |||
| + | ===表单绑定ajax函数=== | ||
| + | 这里我们用jqurey 库 的ajax功能来实现前后端的传输。 | ||
| + | |||
| + | [[文件:java2020-13-4.png|600px]] | ||
| + | |||
| + | [[文件:java2020-13-5.png|600px]] | ||
| + | |||
| + | [[文件:java2020-13-6.png|600px]] | ||
| + | |||
===创建servlet=== | ===创建servlet=== | ||
| − | 2.向工程添加一个servlet文件 | + | 2.向工程添加一个servlet文件,servlet 负责接收前台传来的数据。 |
新建一个package叫main,然后在包名 右键→New→Servlet | 新建一个package叫main,然后在包名 右键→New→Servlet | ||
| − | <nowiki>package | + | Servlet命名为Login. |
| + | |||
| + | <nowiki>package main; | ||
import java.io.IOException; | import java.io.IOException; | ||
| 第100行: | 第108行: | ||
/** | /** | ||
| − | * Servlet implementation class | + | * Servlet implementation class Login |
*/ | */ | ||
| − | @WebServlet("/ | + | @WebServlet("/Login") |
| − | public class | + | public class Login extends HttpServlet { |
| − | + | private static final long serialVersionUID = 1L; | |
| − | + | ||
/** | /** | ||
| − | * @see HttpServlet# | + | * @see HttpServlet#HttpServlet() |
*/ | */ | ||
| − | + | public Login() { | |
| − | // TODO Auto-generated | + | super(); |
| − | + | // TODO Auto-generated constructor stub | |
| − | |||
| − | |||
| − | |||
| − | |||
| − | |||
| − | |||
} | } | ||
| + | |||
| + | /** | ||
| + | * @see HttpServlet#doGet(HttpServletRequest request, HttpServletResponse response) | ||
| + | */ | ||
| + | protected void doGet(HttpServletRequest request, HttpServletResponse response) throws ServletException, IOException { | ||
| + | // TODO Auto-generated method stub | ||
| + | //response.getWriter().append("Served at: ").append(request.getContextPath()); | ||
| + | response.setContentType("text/json;charset=UTF-8"); | ||
| + | response.setCharacterEncoding("UTF-8"); | ||
| + | PrintWriter out = response.getWriter(); | ||
| + | String username = request.getParameter("username"); //从前端获取数据first | ||
| + | String password = request.getParameter("password"); | ||
| + | System.out.println(username+","+password); | ||
| + | String message=""; | ||
| + | if(password.equals("123456") ){ | ||
| + | message ="登陆成功!"; | ||
| + | }else { | ||
| + | message ="登陆失败!"; | ||
| + | } | ||
| + | |||
| + | message ="{\"姓名\":\""+username+"\",\"信息\":\""+message+"\"}"; | ||
| + | out.println(message); //将数据传到前端 | ||
| + | out.flush(); | ||
| + | out.close(); | ||
| + | |||
| + | |||
| + | |||
| + | } | ||
| + | |||
| + | /** | ||
| + | * @see HttpServlet#doPost(HttpServletRequest request, HttpServletResponse response) | ||
| + | */ | ||
| + | protected void doPost(HttpServletRequest request, HttpServletResponse response) throws ServletException, IOException { | ||
| + | // TODO Auto-generated method stub | ||
| + | doGet(request, response); | ||
| + | |||
| + | |||
| + | } | ||
| + | |||
| + | } | ||
} | } | ||
</nowiki> | </nowiki> | ||
| − | |||
===.创建一个web.xml=== | ===.创建一个web.xml=== | ||
| 第130行: | 第171行: | ||
根据不同的url来调用不同的servlet来进行处理。 | 根据不同的url来调用不同的servlet来进行处理。 | ||
| + | WebContent/WEB-INF: | ||
<nowiki><?xml version="1.0" encoding="UTF-8"?> | <nowiki><?xml version="1.0" encoding="UTF-8"?> | ||
| − | <web-app xmlns:xsi="http://www.w3.org/2001/XMLSchema-instance" xmlns="http:// | + | <web-app xmlns:xsi="http://www.w3.org/2001/XMLSchema-instance" xmlns="http://xmlns.jcp.org/xml/ns/javaee" xsi:schemaLocation="http://xmlns.jcp.org/xml/ns/javaee http://xmlns.jcp.org/xml/ns/javaee/web-app_4_0.xsd" id="WebApp_ID" version="4.0"> |
| − | <display-name></display-name> | + | <display-name>TestJavaWeb</display-name> |
| + | <welcome-file-list> | ||
| + | <welcome-file>index.html</welcome-file> | ||
| + | <welcome-file>index.htm</welcome-file> | ||
| + | <welcome-file>index.jsp</welcome-file> | ||
| + | <welcome-file>default.html</welcome-file> | ||
| + | <welcome-file>default.htm</welcome-file> | ||
| + | <welcome-file>default.jsp</welcome-file> | ||
| + | </welcome-file-list> | ||
<servlet> | <servlet> | ||
| − | <servlet-name> | + | <servlet-name>Login</servlet-name> |
| − | <servlet-class> | + | <servlet-class>main.Login</servlet-class> |
</servlet> | </servlet> | ||
<servlet-mapping> | <servlet-mapping> | ||
| − | <servlet-name> | + | <servlet-name>Login</servlet-name> |
| − | <url-pattern>/ | + | <url-pattern>/login.do</url-pattern> |
</servlet-mapping> | </servlet-mapping> | ||
</web-app></nowiki> | </web-app></nowiki> | ||
| 第147行: | 第197行: | ||
效果图: | 效果图: | ||
| − | [[文件: | + | [[文件:java2020-13-2.png]] |
点击后: | 点击后: | ||
| − | [[文件: | + | [[文件:java2020-13-3.png]] |
==什么是MVC== | ==什么是MVC== | ||
2020年6月26日 (五) 08:28的最新版本
servlet+jsp+java实现Web 应用
用java来构建一个web应用是特别容易的事情,jsp和php很像,可以嵌套在html中。程序的结构很简单,也很清楚,本文主要记录下大概的开发过程和环境的搭建。
开发过程
创建项目
1.建立一个Dynamic Web Project
项目名称:test03
创建一个登陆页面
2.创建一个欢迎页面
页面可以是jsp/html,我们用我们最熟悉的html页面
<html>
<head>
<meta http-equiv="Content-Type" content="text/html; charset=utf-8"/>
<script src="https://code.jquery.com/jquery-3.0.0.min.js"></script>
<style type="text/css">
.layer2{width:400px; height:auto; padding:30px; margin:30px auto; background:#ddf; border-radius:8px;}

#login
  {
  width:70%;margin:0 auto;

  }

#login, #login td
  {
     /*border:1px solid black; */
     border-collapse:collapse;
  }
 caption{
 	font:normal bold 150% "仿宋" ; color:#a00; text-align:center
 }
 #login td {
 	padding:10px;
 }
 #login input
  {

    height:35px;

  }
#login .col1{ width:35%;text-align:center;  }
#login .col2{ text-align:center; }
#login .col3{ text-align:center; height:45px;}

.bn{
	margin: 0 10px; font:normal bold 150% "宋体";
}
</style>
</head>
<body><div class="layer2">
<form  method="post" >
<table id="login">
<caption>用户登录界面</caption>
<tr>
<td class="col1">用户名</td>
<td class="col2"><input type="text" name="username"/></td>
</tr>

<tr>
<td class="col1">密码</td>
<td class="col2"><input type="password" name="password" /></td>
</tr>

<tr>
<td colspan="2" class="col3"><input type="submit" value="提 交" class="bn" />
                          <input type="reset" value="取 消" class="bn" /></td>

</tr>
</table>
</form>
</div>
</body>

</html>
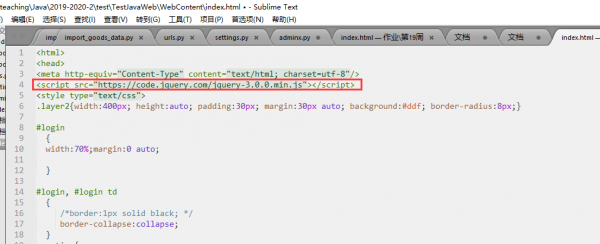
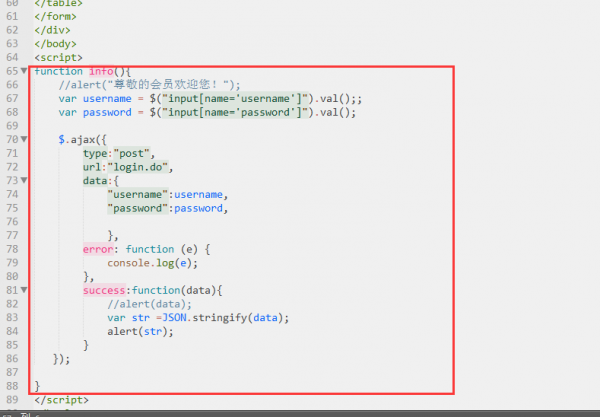
表单绑定ajax函数
这里我们用jqurey 库 的ajax功能来实现前后端的传输。
创建servlet
2.向工程添加一个servlet文件,servlet 负责接收前台传来的数据。
新建一个package叫main,然后在包名 右键→New→Servlet
Servlet命名为Login.
package main;

import java.io.IOException;
import java.io.PrintWriter;

import javax.servlet.ServletException;
import javax.servlet.annotation.WebServlet;
import javax.servlet.http.HttpServlet;
import javax.servlet.http.HttpServletRequest;
import javax.servlet.http.HttpServletResponse;

/**
 * Servlet implementation class Login
 */
@WebServlet("/Login")
public class Login extends HttpServlet {
	private static final long serialVersionUID = 1L;

    /**
     * @see HttpServlet#HttpServlet()
     */
    public Login() {
        super();
        // TODO Auto-generated constructor stub
    }

	/**
	 * @see HttpServlet#doGet(HttpServletRequest request, HttpServletResponse response)
	 */
	protected void doGet(HttpServletRequest request, HttpServletResponse response) throws ServletException, IOException {
		// TODO Auto-generated method stub
		//response.getWriter().append("Served at: ").append(request.getContextPath());
		 response.setContentType("text/json;charset=UTF-8");
	     response.setCharacterEncoding("UTF-8");
	     PrintWriter out = response.getWriter();
	     String username = request.getParameter("username");           //从前端获取数据first
	     String password = request.getParameter("password");
	     System.out.println(username+","+password);
	     String message="";
	     if(password.equals("123456") ){
	        message ="登陆成功!";
	     }else {
	    	message ="登陆失败!";
	     }

	     message ="{\"姓名\":\""+username+"\",\"信息\":\""+message+"\"}";
	     out.println(message);                                                 //将数据传到前端
	     out.flush();
	     out.close();


	}

	/**
	 * @see HttpServlet#doPost(HttpServletRequest request, HttpServletResponse response)
	 */
	protected void doPost(HttpServletRequest request, HttpServletResponse response) throws ServletException, IOException {
		// TODO Auto-generated method stub
		doGet(request, response);


	}

}

}
.创建一个web.xml
web.xml用来建立servlet与jsp的关系(需要放在WEB-INF内)。
根据不同的url来调用不同的servlet来进行处理。
WebContent/WEB-INF:
<?xml version="1.0" encoding="UTF-8"?>
<web-app xmlns:xsi="http://www.w3.org/2001/XMLSchema-instance" xmlns="http://xmlns.jcp.org/xml/ns/javaee" xsi:schemaLocation="http://xmlns.jcp.org/xml/ns/javaee http://xmlns.jcp.org/xml/ns/javaee/web-app_4_0.xsd" id="WebApp_ID" version="4.0">
  <display-name>TestJavaWeb</display-name>
  <welcome-file-list>
    <welcome-file>index.html</welcome-file>
    <welcome-file>index.htm</welcome-file>
    <welcome-file>index.jsp</welcome-file>
    <welcome-file>default.html</welcome-file>
    <welcome-file>default.htm</welcome-file>
    <welcome-file>default.jsp</welcome-file>
  </welcome-file-list>
  <servlet>
    <servlet-name>Login</servlet-name>
    <servlet-class>main.Login</servlet-class>
   </servlet>
   <servlet-mapping>
    <servlet-name>Login</servlet-name>
    <url-pattern>/login.do</url-pattern>
  </servlet-mapping>
</web-app>
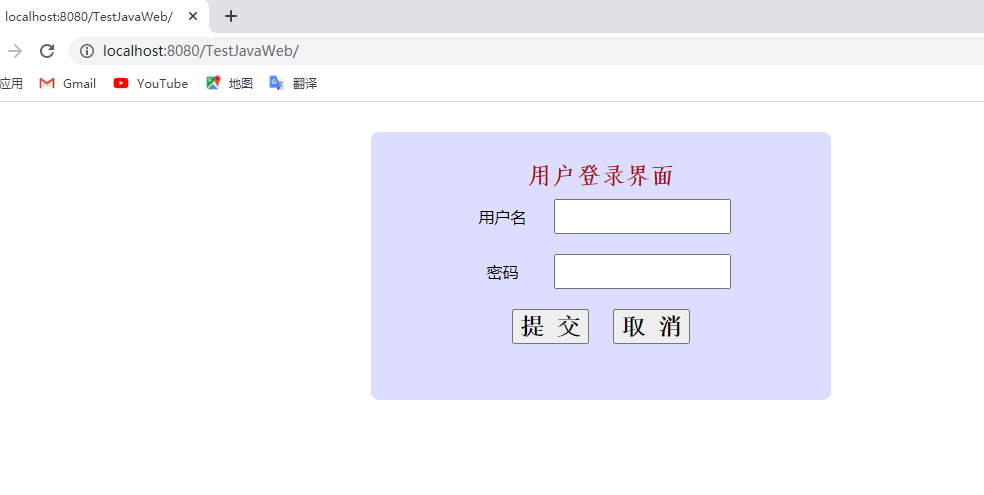
效果图:
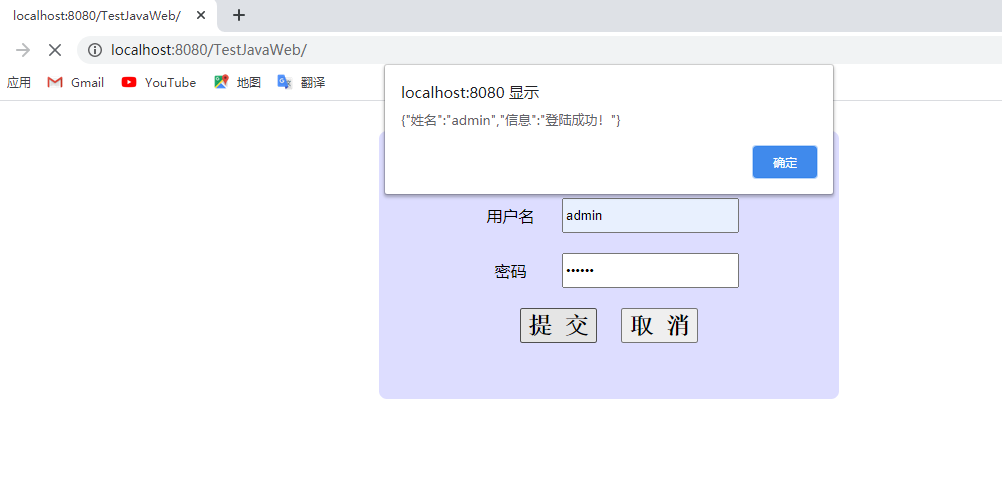
点击后:
什么是MVC
MVC全名是Model View Controller,是模型(model)-视图(view)-控制器(controller)的缩写。其实上面的结构就是一种MVC,页面用jsp来展现,控制用servlet,而模型就是用普通的JAVA类来实现不同的处理过程。
参考:


