表单的布局
来自CloudWiki
表单的布局
- 表单的布局一般可以使用表格进行布局
- 使用表格布局能让表单更加整齐
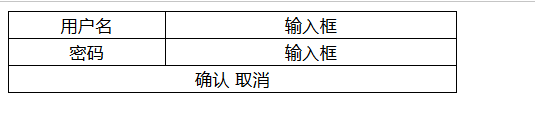
第一步,绘制表格
- 首先,在Word或白纸上绘制出你想做的表单。
- 然后在网页上绘制相应的表格
- 源代码:

<html>
<head>
<style type="text/css">
#login
 {
	  width:70%;
  }

#login, #login td
  {
     border:1px solid black;
     border-collapse:collapse;
  }
#login .col1{ width:35%;text-align:center;  }
#login .col2{ text-align:center; }
#login .col3{ text-align:center; }
</style>
</head>

<body><div id="layer2">
<caption>用户登录界面</caption>
<table id="login">
<tr>
	<td class="col1">用户名</td>
	<td class="col2">输入框</td>
</tr>

<tr>
	<td class="col1">密码</td>
	<td class="col2">输入框</td>
</tr>

<tr>
	<td colspan="2" class="col3">确认 取消</td>

</tr>

</table></div>

</body>
</html>
第二步,在表格中添加表单元素

- 源代码:

<body><div class="layer2">
<form  method="get" >
<table id="login">
<caption>用户登录界面</caption>
<tr>
<td class="col1">用户名</td>
<td class="col2"><input type="text" name="uName"/></td>
</tr>

<tr>
<td class="col1">密码</td>
<td class="col2"><input type="password" name="pass" /></td>
</tr>

<tr>
<td colspan="2" class="col3"><input type="submit" value="提 交" class="bn"/>
                          <input type="reset" value="取 消" class="bn" /></td>

</tr>
</table>
</form>
</div>
</body>
第三步,修饰与美化
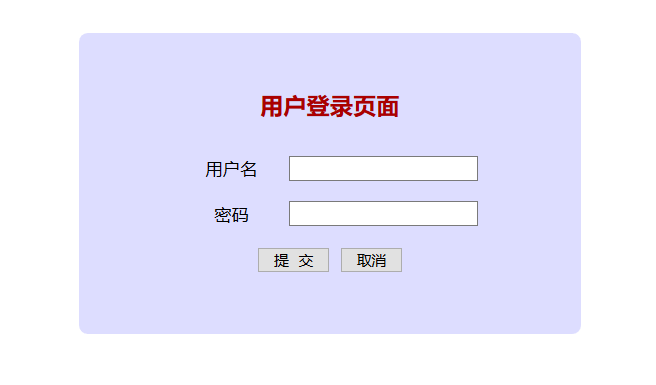
- 源代码:

#layer2{width:400px; height:auto; padding:30px; margin:30px auto; background:#ddf; border-radius:8px;}

#login
  {
  width:70%;margin:0 auto;

  }

#login, #login td
  {
     /*border:1px solid black; */
     border-collapse:collapse;
  }
 caption{
 	font:normal bold 150% "仿宋" ; color:#a00; text-align:center
 }
 #login td {
 	padding:10px;
 }
 #login input
  {

    height:35px;

  }
#login .col1{ width:35%;text-align:center;  }
#login .col2{ text-align:center; }
#login .col3{ text-align:center; height:45px;}

.bn{
	margin: 0 10px; font:normal bold 150% "宋体";
}
拓展:使用div+css设计表单
- 登陆注册表单
- 课本p166页
- 源代码2:
<head>
<meta http-equiv="Content-Type" content="text/html; charset=gb2312" />
<title>邮箱账号登录</title>
<style type="text/css">
  <nowiki>.divLogin{width:260px; height: auto; padding:10px; margin:0 auto; border:1px solid #aaf; border-radius:5px;}
  .divLogin>form>div{width:240px; height:20px; padding:10px 5px; margin:20px auto; border:1px solid #ccc; border-radius:5px;}
  .divLeft{width:20px; height:20px; margin:0; background-image:url(image/bg_v3.png);  float:left;}
  .divRight{width:215px; height:20px; margin:0 0 0 5px; float:left; font-size:12pt; font-family:Calibri;}
  .divRight input{ height:20px; padding:0; margin:0; border:0; outline:none; font-size:12pt;}
  .boxShadowShow{ box-shadow:0 0 3px 0 #66f;  }
  .boxShadowNone{ box-shadow:0;  }
  #uname{width:140px;}
  #psd{width:220px;}
  #divLeft1{background-position:-150px -62px;}
  #divLeft2{background-position:-175px -62px;}
  p{text-align:center;}
  .login,.cancel{width:110px; height:40px; border-radius:5px;}
  .login{background:url(image/bg_v3.png) 0px -210px; /*background:#66f;*/}
  .cancel{background:url(image/bg_v3.png) -120px -210px; /*background:#eef;*/}
  h3{font-size:16pt; font-family:黑体; line-height:30px; text-align:center;}
</style>
</head><body>
  <div class="divLogin">
  <h3>邮箱账号登录</h3>
  <form method="get">
    <div id="divOut1">
      <div class="divLeft" id="divLeft1"></div>
      <div class="divRight"><input type="text" id="uname" placeholder="邮箱账号或手机号" />@163.com</div>
    </div>
    <div id="divOut2">
      <div class="divLeft" id="divLeft2"></div>
      <div class="divRight"><input type="text" id="psd" placeholder="密码" /></div>
    </div>
    <p><input type="submit" value="登录" class="login" />
       <input type="reset" value="取消" class="cancel" /></p>
  </form>
  </div></body></nowiki>
返回 网页设计与开发