2022怡然:远程关机/重启 查看机房列表
来自CloudWiki
目录
前端获取后端数据
原始版
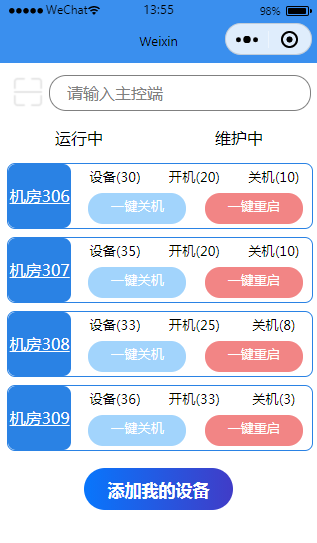
在这个版本中,前端所有的数据 都来自前端本身,
储存在js文件 data区域内,
未从后端读取数据。
WXML
<!-- 顶部 -->
<view class="box1">
<image bindtap="scanCodeEvent" src="../../img/扫码.png" >{{scanCode}}</image>
<input type="text" name="" id="" placeholder="请输入主控端"/>
</view>
<!-- 导航栏 -->
<view class="box2">
<view class="box2-1">
<view>运行中</view>
<view>维护中</view>
</view>
<!-- 下方 -->
<view class="box2-2"wx:for="{{listBox}}" wx:key="id">
<view class="square" >{{item.title}}</view>
<view class="hou">
<view class="on">
<view>设备({{item.total_num}})</view>
<view>开机({{item.running_num}})</view>
 <view>关机({{item.close_num}})</view>
</view>
<view class="under">
<button class="btn1" style="width: 230rpx; height: 74rpx;" >一键关机</button>
<button class="btn2" style="width: 230rpx; height: 74rpx;">一键重启</button>
</view>
</view>
</view>
</view>
<!-- 添加设备 -->
<button class="box3" style="width: 350rpx; height: 100rpx;">添加我的设备</button>
WXSS
.box1 image{
width: 100rpx;
height: 100rpx;

}
.box1 input{
width: 80%;
height: 80rpx;
border: 1rpx #808080 solid;
border-radius: 40rpx;
padding-left: 40rpx;
margin-top: 10rpx;
}
.box1{
    display: flex;
    margin: 20rpx;
}
/* 第二 */
.box2-1{
display: flex;
}
.box2-1 view{
width: 50%;
height: 80rpx;
text-align: center;
line-height: 80rpx;
}
/* 下部 */
.box2-2{
    margin: 20rpx;
    width: 95%;
    height: 150rpx;
    border: 1rpx #2A82E4 solid;
    border-radius: 20rpx;display: flex;
}
.square{
width: 150rpx;
height: 150rpx;
background-color: #2A82E4;
border-radius: 20rpx;
color: white;
line-height: 150rpx;
text-align: center;
text-decoration:underline;
}
.hou{
width: 80%;
    height: 150rpx;
}
.on{
display: flex;
width: 100%;
height: 50rpx;margin: 10rpx;
}
.on view{
width: 33%;
height: 50rpx;
text-align: center;
font-size: smaller;
}

.btn1{
padding: 0;
font-size: smaller;
border-radius: 37rpx;
padding: 10rpx;
background-color: #A2D4FC;
color: white;
font-weight: 400;
}
.btn2{
padding: 0;
border-radius: 37rpx;
padding: 10rpx;
background-color: #F28585;
color: white;
font-size: small;
font-weight: 400;
}
.under{
display: flex;
margin-left: 20rpx;
}
/* 底部 */
.box3{padding: 0;
    display: block;
position: absolute;
top:950rpx;
left: 200rpx;
background: -webkit-linear-gradient(left,#0876FC, #403CC7);
line-height: 100rpx;
border-radius: 50rpx;
color: white;
}
JS
// pages/switch/index.js
Page({

  /**
   * 页面的初始数据
   */
  data: {
    scanCode: '../../img/扫码.png',
    listBox: [{
      title: "机房306",
      id:'306',
      total_num:30,
      running_num:20,
      close_num:10
    }, {
      title: "机房307",
      id:'307',
      total_num:35,
      running_num:20,
      close_num:10
    }, {
      title: "机房308",
      id:'308',
      total_num:33,
      running_num:25,
      close_num:8
    }, {
      title: "机房309",
      id:'309',
      total_num:36,
      running_num:33,
      close_num:3
    }]
  },

...

})
改进版
在这个版本中,前端所有的数据 都来自 后端接口,
从后端接口读出数据后,赋值给前端的变量,然后再有WXML页面去渲染。
(WXML 和WXSS 内容与之前相同,不再重复)
后端Flask代码
后端的这个代码 前端人员不用管,只要能在浏览器上访问这个函数所对应的接口就好:http://119.3.251.91:5000/rooms
api.py:
from flask import Flask, render_template, redirect, url_for, request, abort, jsonify
from test_ansible2 import do_ansible
import pymysql

app = Flask("EmailDemo", static_folder="static", template_folder="templates")
app.config["JSON_AS_ASCII"] = False

conn1 = pymysql.connect(host='localhost', user='root', password='123456', port=3306,
                           db='rooms')


####### 远程开机关机 ######

#查看全部机房列表
@app.route('/rooms', methods=['GET', 'POST'])
def get_rooms_list():
    cur = conn1.cursor()
    sql = "SELECT * from tb_rooms LIMIT 4"
    cur.execute(sql)
    u = cur.fetchall()
    jsondata = []
    for row in u:
        result = {}
        result['id'] = row[0]
        result['title']="机房"+str(row[0])
        result['total_num'] = row[1]
        result['running_num'] = row[2]
        result['close_num'] = int(row[1])-int(row[2])
        jsondata.append(result)
    return jsonify(jsondata)
    abort(404)


if __name__ == '__main__':
    app.run(host='0.0.0.0',debug=True)
    conn1.close()
nohup python3 -u api.py > api.log 2>&1 &
测试:在浏览器输入后端接口网址:[云主机IP]+'/rooms' ,如http://119.3.251.91:5000/rooms
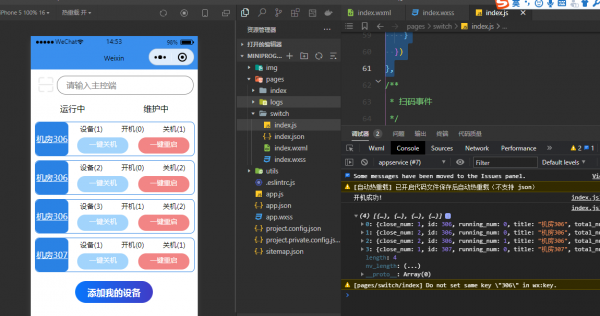
即可在浏览器上看到:
[
  {
    "close_num": 1,
    "id": 306,
    "runnning_num": 0,
    "title": "机房306",
    "total_num": 1
  },
  {
    "close_num": 2,
    "id": 306,
    "runnning_num": 0,
    "title": "机房306",
    "total_num": 2
  },
  {
    "close_num": 2,
    "id": 306,
    "runnning_num": 1,
    "title": "机房306",
    "total_num": 3
  },
  {
    "close_num": 1,
    "id": 307,
    "runnning_num": 0,
    "title": "机房307",
    "total_num": 1
  }
]
下面任务就是微信小程序读出这个接口就好了~
JS
对JS 做如下修改:
listBox的值改为从后端直接读取。
// pages/switch/index.js
Page({

  /**
   * 页面的初始数据
   */
  data: {
    scanCode: '../../img/扫码.png',
    listBox: []
  },

 /**
 * 生命周期函数--监听页面加载
 */
onLoad: function (options) {
  console.log("开机成功!")
  var that = this;
  wx.request({
    url: 'http://119.3.251.91:5000/rooms',
    data:{

    },
    method: 'GET',
    header: {
      'content-type': 'application/json' // 默认值
    },
    success: function (res) {
      console.log(res.data)//打印到控制台
      that.setData({
        listBox:res.data
      })

    }
  })
},

})
效果图:
前端向后端发送数据
前端向后端发送数据的步骤如下:
(WXML中)为发送数据的按钮绑定响应函数和 ID号
(JS)编写按钮的响应函数
(模拟器中)用户运行,点击按钮,触发响应函数,从后端读取数据。
WXML
为发送数据的按钮绑定id 号:
下述代码中重点是这一行:bindtap="openAll" data-id="{{item.id}}"
它通过bind-tap为相应的按钮绑定上响应函数 openAll, 并通过data-id给这个按钮绑定一个id号。
。。。
<view class="under">
<button class="btn1" style="width: 230rpx; height: 74rpx;" bindtap="closeAll" data-id="{{item.id}}">一键关机</button>
<button class="btn2" style="width: 230rpx; height: 74rpx;" >一键重启</button>
。。。
</view>
WXSS
同之前一样。
JS
js代码中添加 按钮的响应函数closeAll:
 // 一键关机
  closeAll: function (event) {
    console.log("关机成功!")
    // console.log(event)//打印事件
    //测试:打印当前id号
    var myid=event.currentTarget.dataset.id
    console.log(myid)
    var that = this;
    wx.request({
      url: 'http://119.3.251.91:5000/ansible/api/v1/machine_close/all/'+myid,//向后台传递当前按钮的id号
      data:{
        //hosts: that.data.listBox[0].id
      },
      method: 'GET',//指明与后端交互的方法
      header: {//指明数据头
        'content-type': 'application/json' // 默认值
      },
      //定义与后端通信成功之后的回调函数
      success: function (res) {
        console.log(res.data)//打印到控制台
        //将后端返回的数据显示在前端
        wx.showToast({
          title: res.data.status,
          icon: '',
          duration: 2000
        });

      }
    })
  },
后端Flask代码
后端添加与一键关机有关的函数接口及其实现:
#get one specific book,GET操作
@app.route('/ansible/api/v1/machine_close/all/<string:host>', methods=['GET'])
def shutdown_machine(host):

    host_list=[host]
    tasks_close=[
        dict(action=dict(module='shell', args='shutdown -h now'), register='shell_out'),
    ]
    #do_ansible(host_list,tasks_close)
    return jsonify({'status': host+"shutdown order is sent"})
    abort(404)
测试运行
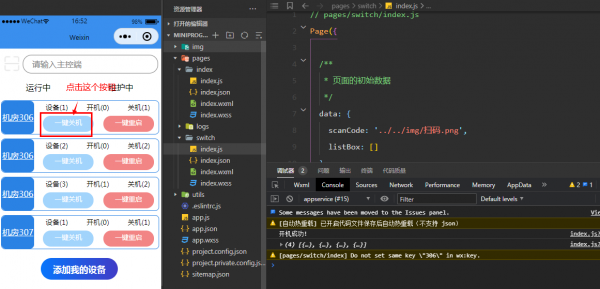
按钮点击前,
点击一键关机按钮,
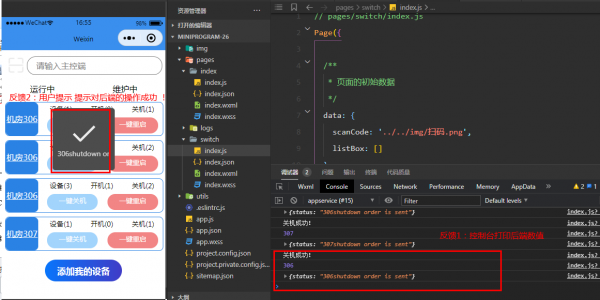
按钮点击后,可以看到前端数据成功的传到了后端,后端并且传回了正确的数据进行反馈:


