Django之文件上传和数据导入
来自CloudWiki
技术要点
1)文件上传;
2)Excel文件导入SQLite数据库。
实施步骤
创建网页
在网站项目的templates文件夹中创建文件uploadQuestions.html,内容如下:
<html>
<head>
<meta charset="utf-8" />
<style type="text/css">
#layer2{width:400px; height:auto; padding:30px; margin:30px auto 0; background:#ddf; border-radius:8px;}
h3{font-size:16pt; color:#a00; text-align:center;}
#login
  {
  width:70%;margin:0 auto;

  }

#login td
  {

    height:40px;

  }
#login .col1{ width:50%;text-align:center;  }
#login .col2{ text-align:center; }
#login .col3{ text-align:center; }
</style>
</head>
<body><div id="layer2">
<form  method="POST" action="/check/uploadQuestions/" enctype="multipart/form-data">
{% csrf_token %} <!-- django自带的防跨站引用攻击功能 -->
<table id="login">
<h3>上传页面</h3>
<tr>
<td class="col1">文件</td>
<td class="col2"><input type="file" name="questionFile" accept=".xlsx" /></td>
</tr>

<tr>
<td colspan="2" class="col3"><input type="submit" value="  上传  " />  </td>

</tr>
<tr> <td colspan="2" >{%if msg%} <span>{{msg}}</span>{%endif%}</td></tr>
</table>
</form>
</div>
</body>
</html>
修改views文件
安装扩展库openpyxl
pip3 install openpyxl
修改questions应用文件夹中的views.py文件,首先导入用到的标准库和扩展库:
from os import mkdir
from os.path import isdir,abspath,dirname,join
from openpyxl import load_workbook

BASE_DIR = dirname(dirname(abspath(__file__)))
然后增加下面的代码,实现文件上传和数据导入:
def uploadQuestions(request):
    if request.method =='POST':
        #创建用来存储上传文件的文件夹
        uploadDir = BASE_DIR + '\\upload'
        if not isdir(uploadDir):
            mkdir(uploadDir)
        #获取上传的文件
        uploadedFile = request.FILES.get('questionFile')
        if not uploadedFile:
            return render(request,'uploadQuestions.html',
                          {'msg':'没有选择文件'})
        if not uploadedFile.name.endswith('.xlsx'):
            return render(request,'uploadQuestions.html',
                          {'msg':'文件类型须为xlsx'})
        #上传,写入服务器文件,
        dstFileName = join(uploadDir,uploadedFile.name)
        with open(dstFileName,'wb') as fp:
            for chunk in uploadedFile.chunks():
                fp.write(chunk)

        #导入数据库,Excel文件中有两列,第一列是题干,第
        #二列是答案,第一行是表头
        ws = load_workbook(dstFileName).worksheets[0]
        for index,row in enumerate(ws.rows):
            if index == 0:
                continue
            try:
                Question3(questionContent=row[0].value,
                         option_a=row[1].value,
                         option_b=row[2].value,
                         option_c=row[3].value,
                         option_d=row[4].value,
                         answer=row[5].value).save()
            except:
                pass
        return render(request,'uploadQuestions.html',
                          {'msg':'导入成功'})
    else:
        return render(request,'uploadQuestions.html',
                          {'msg':None})
增加路由
修改questions应用文件夹的urls.py文件,增加路由。
from django.urls import path
from . import views

urlpatterns = [
        path('',views.index),
        path('login/',views.login),
        path('register/',views.register),
        path('uploadQuestions/',views.uploadQuestions),
        ]
验证功能
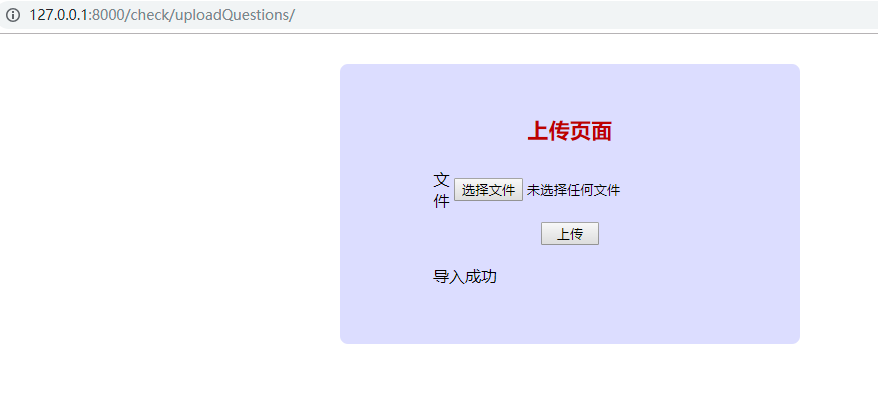
执行命令,运行服务器,使用浏览器访问http://127.0.0.1:8000/check/uploadQuestions/,自动跳转到登录页面,使用上节课注册的账号登录,然后回到上传页面,选择Excel题库文件,上传。当然,上次课介绍的是学生用户的注册和登录,是不应该让学生用户能够导入数据的,可以调整代码调整这个设计。

