Django REST framework 安装及使用
目录
Django REST framework 简介
前后端分离的好处
前端现在有越来越强大的框架,后端也有很多语言可以实现接口,将前后端分离有助于技术栈的选择和配合,也能更好的让技术人员发挥长板。 对于一个系统存在多个使用端的时候,比如微信、App、网站,前后端分离后大部分接口是可以直接复用的。
Django REST framework 简介
Django REST framework 是一套基于Django框架编写RESTful风格API的组件。
安装及使用步骤
配置环境
pip3 install djangorestframework -i http://mirrors.aliyun.com/pypi/simple --trusted-host mirrors.aliyun.com
创建项目
[root@localhost ~]# django-admin startproject tutorial
[root@localhost ~]# ls
anaconda-ks.cfg                CentOS-Sources.repo      jdk1.8.0_211
apache-maven-3.5.4-bin.tar.gz  centos.tar               jdk-8u211-linux-x64.tar.gz
big_data                       CentOS-Vault.repo        mongodb-linux-x86_64-rhel62-4.0.0.tgz
CentOS-Base.repo               docker-ce.repo           Python-3.6.5
CentOS-CR.repo                 Dockerfile               Python-3.6.5.tgz
CentOS-Debuginfo.repo          elasticsearch-5.5.1      tutorial
CentOS-fasttrack.repo          elasticsearch-5.5.1.zip
CentOS-Media.repo              HelloWorld
创建APP
[root@localhost ~]# cd tutorial
[root@localhost tutorial]# python3 manage.py startapp product
[root@localhost tutorial]# tree .
.
├── db.sqlite3
├── manage.py
├── product
│   ├── admin.py
│   ├── apps.py
│   ├── __init__.py
│   ├── migrations
│   │   └── __init__.py
│   ├── models.py
│   ├── tests.py
│   └── views.py
└── tutorial
    ├── __init__.py
    ├── __pycache__
    │   ├── __init__.cpython-36.pyc
    │   ├── settings.cpython-36.pyc
    │   └── urls.cpython-36.pyc
    ├── settings.py
    ├── urls.py
配置APP
在tutorial/settings.py 中添加APP:
[root@localhost tutorial]# vi settings.py
INSTALLED_APPS = [
    'django.contrib.admin',
    'django.contrib.auth',
    'django.contrib.contenttypes',
    'django.contrib.sessions',
    'django.contrib.messages',
    'django.contrib.staticfiles',
    'rest_framework',
    'product',
]
配置URL
在tutorial/urls.py中配置URL:
from django.contrib import admin
from django.urls import path
from django.conf.urls import include

urlpatterns = [
    path('admin/', admin.site.urls),
    path('product/', include('product.urls')),
]
编写内部路由文件:
priduct/urls:
from django.conf.urls import  url
from . import views

urlpatterns = [

]
编写model层
/product/models.py
from django.db import models

class Product(models.Model):
    name = models.CharField(max_length=50)
    price = models.DecimalField(max_digits=8,decimal_places=2)

    def __str__(self):
          return self.name
配置数据库
[root@localhost tutorial]# python3 manage.py makemigrations
[root@localhost tutorial]# python3 manage.py migrate
编写序列化模块
使用 Serializer 可以将 queryset, model 实例等复杂数据类型(complex types)序列化成原生的 python 数据结构,且将其渲染成 JSON,XML 等其他数据类型。 Serializers 也可以反序列化,可将输入数据验证后,解析成复杂数据类型。
product/serializers.py
from rest_framework import serializers
from .models import Product

class ProductSerializer(serializers.ModelSerializer):
    class Meta:
        model = Product
        fields = ("id","name","price")
参考文档:https://www.cnblogs.com/crazy-chinese/p/9828095.html
编写视图
product/views.py:
from rest_framework import status
from rest_framework.response import Response
from rest_framework.views import APIView
from rest_framework import generics

from .models import Product
from .serializers import ProductSerializer

# 使用APIView
class ProductView(APIView):
    def get(self, request, format=None):
        product = Product.objects.all()
        serializer = ProductSerializer(product, many=True)
        return Response(serializer.data)

    def post(self, request, format=None):
        serializer = ProductSerializer(data=request.data)
        if serializer.is_valid():
            serializer.save()
            return Response(serializer.data, status=status.HTTP_201_CREATED)
        else:
            return Response(serializer.errors, status=status.HTTP_400_BAD_REQUEST)
编写路由
product/urls.py:
from django.conf.urls import  url
from . import views

urlpatterns = [
    url(r'^api/$', views.ProductView.as_view(), name='product'),
]
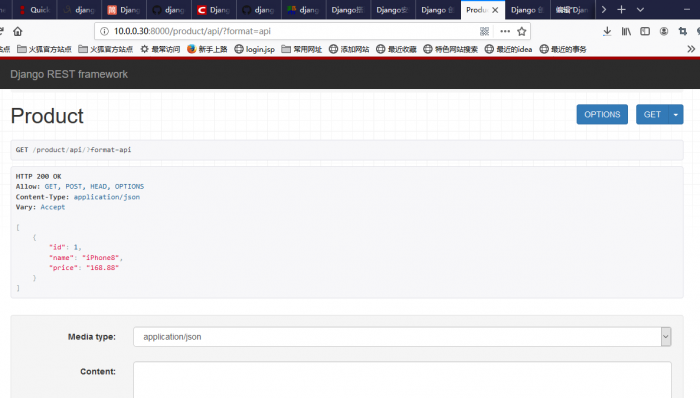
测试
curl http://localhost:8000/product/api/
curl -X POST http://localhost:8000/product/api/ -d "name=iPhone8&price=168.88"
curl http://localhost:8000/product/api/
或直接在浏览器上打开:
参考文档:
[1] https://www.jianshu.com/p/400dfb5e62fb
[2] https://www.django-rest-framework.org/tutorial/quickstart/
