Docker镜像的使用
目录
Docker镜像的定义
Docker 镜像(Image)就是一个只读的模板。例如:一个镜像可以包含一个完整的操作系统环境,里面仅安装了 Apache 或用户需要的其它应用程序。镜像可以用来创建 Docker 容器,一个镜像可以创建很多容器。Docker 提供了一个很简单的机制来创建镜像或者更新现有的镜像,用户甚至可以直接从其他人那里下载一个已经做好的镜像来直接使用。
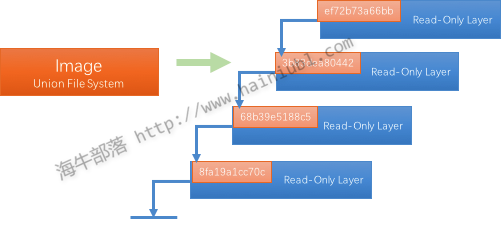
镜像(Image)就是一堆只读层(read-only layer)的统一视角,也许这个定义有些难以理解,看看下面这张图:
右边我们看到了多个只读层,它们重叠在一起。除了最下面一层,其它层都会有一个指针指向下一层。这些层是Docker内部的实现细节,并且能够在docker宿主机的文件系统上访问到。统一文件系统(Union File System)技术能够将不同的层整合成一个文件系统,为这些层提供了一个统一的视角,这样就隐藏了多层的存在,在用户的角度看来,只存在一个文件系统。
Docker镜像操作
当运行容器时,使用的镜像如果在本地中不存在,docker 就会自动从 docker 镜像仓库中下载,默认是从 Docker Hub 公共镜像源下载。
下面我们来学习:
   1、管理和使用本地 Docker 主机镜像
   2、创建镜像
镜像的查找与拖取
列出镜像列表
我们可以使用 docker images 来列出本地主机上的镜像。
runoob@runoob:~$ docker images
REPOSITORY          TAG                 IMAGE ID            CREATED             SIZE
ubuntu              14.04               90d5884b1ee0        5 days ago          188 MB
php                 5.6                 f40e9e0f10c8        9 days ago          444.8 MB
nginx               latest              6f8d099c3adc        12 days ago         182.7 MB
mysql               5.6                 f2e8d6c772c0        3 weeks ago         324.6 MB
httpd               latest              02ef73cf1bc0        3 weeks ago         194.4 MB
ubuntu              15.10               4e3b13c8a266        4 weeks ago         136.3 MB
hello-world         latest              690ed74de00f        6 months ago        960 B
training/webapp     latest              6fae60ef3446        11 months ago       348.8 MB
各个选项说明:
REPOSITORY:表示镜像的仓库源
TAG:镜像的标签
IMAGE ID:镜像ID
CREATED:镜像创建时间
SIZE:镜像大小
同一仓库源可以有多个 TAG,代表这个仓库源的不同个版本,如ubuntu仓库源里,有15.10、14.04等多个不同的版本,我们使用 REPOSITORY:TAG 来定义不同的镜像。
所以,我们如果要使用版本为15.10的ubuntu系统镜像来运行容器时,命令如下:
runoob@runoob:~$ docker run -t -i ubuntu:15.10 /bin/bash
root@d77ccb2e5cca:/#
如果要使用版本为14.04的ubuntu系统镜像来运行容器时,命令如下:
runoob@runoob:~$ docker run -t -i ubuntu:14.04 /bin/bash root@39e968165990:/#
如果你不指定一个镜像的版本标签,例如你只使用 ubuntu,docker 将默认使用 ubuntu:latest 镜像。 获取一个新的镜像
查找镜像
我们可以从 Docker Hub 网站来搜索镜像,Docker Hub 网址为: https://hub.docker.com/
我们也可以使用 docker search 命令来搜索镜像。比如我们需要一个httpd的镜像来作为我们的web服务。我们可以通过 docker search 命令搜索 httpd 来寻找适合我们的镜像。
runoob@runoob:~$ docker search httpd
NAME:镜像仓库源的名称
DESCRIPTION:镜像的描述
OFFICIAL:是否docker官方发布
[root@controller ~]# docker search httpd
NAME                                    DESCRIPTION                                     STARS               OFFICIAL            AUTOMATED
httpd                                   The Apache HTTP Server Project                  2419                [OK]
hypriot/rpi-busybox-httpd               Raspberry Pi compatible Docker Image with a …   46
centos/httpd                                                                            23                                      [OK]
centos/httpd-24-centos7                 Platform for running Apache httpd 2.4 or bui…   22
tplatform/aws-linux-httpd24-php70       aws-linux-httpd24-php70                         3                                       [OK]
mprahl/s2i-angular-httpd24              An S2I image for building and running Angula…   2                                       [OK]
salim1983hoop/httpd24                   Dockerfile running apache config                2                                       [OK]
tplatform/aws-linux-httpd24-php71-fpm   aws-linux-httpd24-php71-fpm                     1                                       [OK]
lead4good/httpd-fpm                     httpd server which connects via fcgi proxy h…   1                                       [OK]
tplatform/aws-linux-httpd24-php71       aws-linux-httpd24-php71                         1                                       [OK]
epflidevelop/os-wp-httpd                WP httpd                                        1                                       [OK]
tplatform/aws-linux-2-httpd24-php72     aws-linux-2-httpd24-php72                       1                                       [OK]
solsson/httpd-openidc                   mod_auth_openidc on official httpd image, ve…   0                                       [OK]
拖取镜像
我们决定使用上图中的httpd 官方版本的镜像,使用命令 docker pull 来下载镜像。
runoob@runoob:~$ docker pull httpd
Using default tag: latest
latest: Pulling from library/httpd
8b87079b7a06: Pulling fs layer
a3ed95caeb02: Download complete
0d62ec9c6a76: Download complete
a329d50397b9: Download complete
ea7c1f032b5c: Waiting
be44112b72c7: Waiting
下载完成后,我们就可以使用这个镜像了。
runoob@runoob:~$ docker run httpd
设置镜像标签
我们可以使用 docker tag 命令,为镜像添加一个新的标签。
[[root@localhost ~]# docker images
REPOSITORY          TAG                 IMAGE ID            CREATED                                                                                                     SIZE
httpd               latest              2ae34abc2ed0        11 days ago                                                                                                 165MB
mysql               latest              d435eee2caa5        2 weeks ago                                                                                                 456MB
hello-world         latest              fce289e99eb9        11 months ago                                                                                               1.84kB
ubuntu              15.10               9b9cb95443b5        3 years ago                                                                                                 137MB
[root@localhost ~]# docker tag 2ae34abc2ed0 apacche:mine
[root@localhost ~]# docker images
REPOSITORY          TAG                 IMAGE ID            CREATED                                                                                                     SIZE
apacche             mine                2ae34abc2ed0        11 days ago                                                                                                 165MB
httpd               latest              2ae34abc2ed0        11 days ago                                                                                                 165MB
mysql               latest              d435eee2caa5        2 weeks ago                                                                                                 456MB
hello-world         latest              fce289e99eb9        11 months ago                                                                                               1.84kB
ubuntu              15.10               9b9cb95443b5        3 years ago
镜像与容器
利用镜像启动容器
我们使用镜像来创建一个容器。
语法
docker run [OPTIONS] IMAGE [COMMAND] [ARG...]
常用的参数有 -i ,-t ,和 -d
OPTIONS说明:
   -a stdin: 指定标准输入输出内容类型,可选 STDIN/STDOUT/STDERR 三项;

    -d: 后台运行容器,并返回容器ID;

    -i: 以交互模式运行容器,通常与 -t 同时使用;

    -p: 端口映射,格式为:主机(宿主)端口:容器端口

    -t: 为容器重新分配一个伪输入终端,通常与 -i 同时使用;

    --name="nginx-lb": 为容器指定一个名称;
runoob@runoob:~$ docker pull ubuntu:15.10
runoob@runoob:~$ docker run -t -i ubuntu:15.10 /bin/bash
root@e218edb10161:/#
在完成操作之后,输入 exit命令来退出这个容器。
镜像的更新与修改
更新镜像
更新镜像之前,我们需要使用镜像来创建一个容器(上一步已做)
docker run -t -i httpd /bin/bash
[root@localhost ~]#
root@68667f84eb01:/usr/local/apache2#
root@68667f84eb01:/usr/local/apache2# ls
 bin      conf    icons    modules
build    error   include
cgi-bin  htdocs  logs
在运行的容器内使用touch命令创建一个文本文档
root@68667f84eb01:/usr/local/apache2# touch 123.txt
root@68667f84eb01:/usr/local/apache2# ls
123.txt bin build cgi-bin conf error htdocs icons include logs modules
在完成操作之后,输入 exit命令来退出这个容器。
此时ID为68667f84eb01的容器,是按我们的需求更改的容器。我们可以通过命令 docker commit来提交容器副本。
docker commit :从容器创建一个新的镜像。
runoob@runoob:~$ docker commit -m="has update" -a="runoob" 68667f84eb01 runoob/httpd:v2
sha256:70bf1840fd7c0d2d8ef0a42a817eb29f854c1af8f7c59fc03ac7bdee9545aff8
各个参数说明:
-m:提交的描述信息
-a:指定镜像作者
e218edb10161:容器ID
runoob/ubuntu:v2:指定要创建的目标镜像名
我们可以使用 docker images 命令来查看我们的新镜像 runoob/httpd:v2:
runoob@runoob:~$ docker images
REPOSITORY          TAG                 IMAGE ID            CREATED             SIZE
runoob/ubuntu       v2                  70bf1840fd7c        15 seconds ago      158.5 MB
ubuntu              14.04               90d5884b1ee0        5 days ago          188 MB
php                 5.6                 f40e9e0f10c8        9 days ago          444.8 MB
nginx               latest              6f8d099c3adc        12 days ago         182.7 MB
mysql               5.6                 f2e8d6c772c0        3 weeks ago         324.6 MB
httpd               latest              02ef73cf1bc0        3 weeks ago         194.4 MB
ubuntu              15.10               4e3b13c8a266        4 weeks ago         136.3 MB
hello-world         latest              690ed74de00f        6 months ago        960 B
training/webapp     latest              6fae60ef3446        12 months ago       348.8 MB
使用我们的新镜像 runoob/httpd 来启动一个容器
runoob@runoob:~$ docker run -t -i runoob/httpd:v2 /bin/bash
root@1a9fbdeb5da3:/#
镜像的修改
[root@controller ~]# docker run -itd tomcat
8cde0c174b6e76a1c7fe808c881af1093dccebc6fca742f1e471fa60757b4d09
[root@controller ~]# docker exec -it  8cde0c174b6e76a1c7fe808c881af1093dccebc6fca742f1e471fa60757b4d09 bash
root@8cde0c174b6e:/usr/local/tomcat# touch hello
root@8cde0c174b6e:/usr/local/tomcat# ls
BUILDING.txt  CONTRIBUTING.md  LICENSE  NOTICE  README.md  RELEASE-NOTES  RUNNING.txt  bin  conf  hello  include  lib  logs  native-jni-lib  temp  webapps  work
root@8cde0c174b6e:/usr/local/tomcat#exit
镜像的导出与保存
镜像存出
将本地镜像存出,以备迁移到其他机器上继续使用,存出的结果是得到一个tar压缩包
例如:存储本地的ubuntu:latest镜像为文件ubuntu_latest.tar
命令:docker save
命令样例:
[root@localhost ~]# docker save -o apache.tar runoob/httpd:v2
[root@localhost ~]# ls
anaconda-ks.cfg  cirros-0.3.3-i386-disk.img
apache.tar       container-selinux-2.107-3.el7.noarch.rpm
tar包存储位置:当前路径
镜像加载
[root@controller ~]# docker load -i apache.tar
Loaded image: tomcat:java_web
[root@controller ~]# docker images
REPOSITORY          TAG                 IMAGE ID            CREATED                  SIZE
java                latest              5a069ba3df4d        Less than a second ago   465MB
tomcat              java_web            5a069ba3df4d        Less than a second ago   465MB
tomcat              latest              5a069ba3df4d        Less than a second ago   465MB
httpd               latest              d4a07e6ce470        Less than a second ago   132MB
runoob/ubuntu       v2                  bfc7698feaf0        22 minutes ago           137MB
hello-world         latest              fce289e99eb9        2 months ago             1.84kB
ubuntu              15.10               9b9cb95443b5        2 years ago              137MB
镜像命名并上传到仓库
上传到官方仓库:
[root@controller ~]# docker push runoob/httpd:v2
The push refers to repository [docker.io/library/tomcat]
bf3787ea6b71: Layer already exists
1a49da25284a: Layer already exists
35e1fbb194d7: Layer already exists
2489d7a0e827: Layer already exists
b234086ec9dd: Layer already exists
af2a4009a54d: Layer already exists
1908d3f22285: Layer already exists
2fe266fe1ee6: Layer already exists
12cb127eee44: Layer already exists
604829a174eb: Layer already exists
fbb641a8b943: Layer already exists
errors:
denied: requested access to the resource is denied
unauthorized: authentication required
上传到私人仓库:暂无
镜像的删除
[root@docker1 ~]# docker ps -a
[root@docker1 ~]# docker stop 98c1b70c1ea2
[root@docker1 ~]# docker rmi -f ebdc8e295a2e
Untagged: 172.24.14.104:5000/ubuntu:14.04.3
参考文档:
[1] http://www.runoob.com/docker/docker-image-usage.html
[[2] https://blog.csdn.net/chenyang1010/article/details/88324034
