Python Web开发:在线Web计算器
目录
简介
功能概述
项目功能主要是实现一个在线计算器,
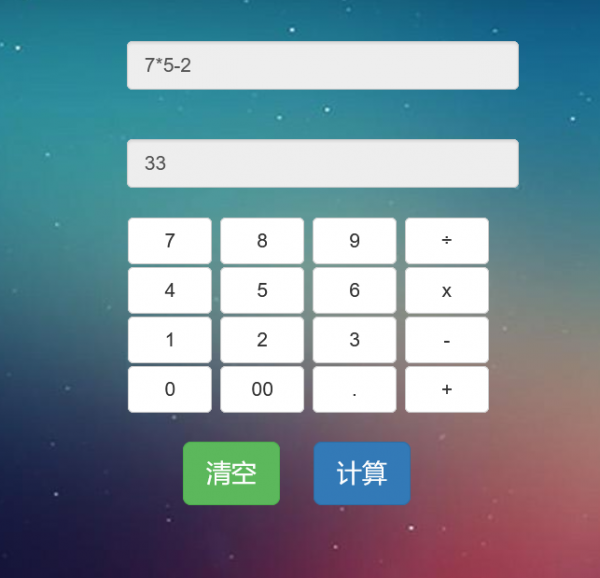
在输入框中输入计算式,单击“计算”按钮就可以输出结果
技术原理
- 前端采用Bootstrap进行制作,然后通过ajax方式传输给后台
- 后台采用django进行开发
配置并访问页面
创建项目
C:\Users\maxin>d:
D:\>cd D:\Tech\大数据\Python Web开发从入门到实战\mycode
D:\Tech\大数据\Python Web开发从入门到实战\mycode>django-admin startproject compute
D:\Tech\大数据\Python Web开发从入门到实战\mycode>cd compute
D:\Tech\大数据\Python Web开发从入门到实战\mycode>python manage.py startapp app
D:\Tech\大数据\Python Web开发从入门到实战\mycode\compute>python manage.py runserver
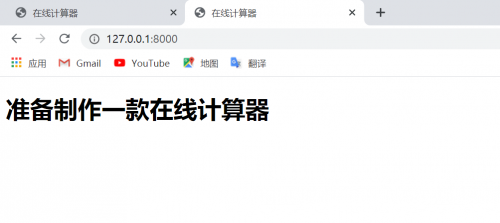
项目启动后,通过浏览器访问:http://127.0.0.1:8000/
新建页面
在app目录下创建templates子文件夹,
在其中新建index.html文件。
<!DOCTYPE html>
<html>
	<head>
		<meta charset="utf-8">
		<title>在线计算器</title>
	</head>
	<body>
		<h1>准备制作一款在线计算器</h1>
	</body>
</html>
配置应用
将app导入到项目中: 打开配置文件夹compute下的settings.py
找到INSTALLED_APPS字段,添加刚创建的app应用
# Application definition

INSTALLED_APPS = [
    'django.contrib.admin',
    'django.contrib.auth',
    'django.contrib.contenttypes',
    'django.contrib.sessions',
    'django.contrib.messages',
    'django.contrib.staticfiles',
    'app',
]
另外,为了访问方便,需要开放访问权限,找到ALLOWED_HOSTS字段
ALLOWED_HOSTS = ['*',]
配置视图处理函数
配置视图处理函数,编辑app文件夹下的views.py:
添加了访问首页的home函数
from django.shortcuts import render

# Create your views here.

def home(request):
    return render(request,'index.html')
配置路由
compute\compute\urls.py:
from django.contrib import admin
from django.urls import path
from app.views import home #导入views模块

urlpatterns = [
    path('admin/', admin.site.urls),
    path('',home,name='home'),#配置访问路径
]
启动项目
在命令行输入
python manage.py runserver
浏览器打开:
导入Bootstrap前端框架
本节阐述如何在Django中使用Bootstrap,
关键点在于Django静态资源的配置。
静态文件导入
在compute项目的app中创建一个名为static的子文件夹,然后将Bootstrap中的css,fonts,js三个子文件夹复制,
另外新建一个名为img的子文件夹来存放图片。
编写index.html文件
{% load staticfiles %}
<!DOCTYPE html>
<html>

<head>
    <meta charset="utf-8">
    <meta http-equiv="X-UA-Compatible" content="IE=edge">
    <meta name="viewport" content="width=device-width, initial-scale=1">
    <title>在线计算器</title>
    <link rel="stylesheet" href="{% static 'css/bootstrap.min.css' %}" />
    <link rel="stylesheet" href="{% static 'css/style.css' %}" />
    <script src="{% static 'js/jquery.min.js' %}"></script>
    <script src="{% static 'js/bootstrap.min.js' %}"></script>
</head>

<body>

        <button type="button" class="btn btn-success btn-lg btn_clear" id="lgbut_clear"
                        onclick="fun_clear()">清空</button>
        <button type="button" class="btn btn-primary btn-lg" id="lgbut_compute">
                        计算</button>

</body>

</html>
静态文件配置
打开配置文件夹compute下的settings.py
添加如下配置:
STATIC_URL = '/static/'
STATICFILES_DIRS=[

    os.path.join(BASE_DIR,'static'),

]
说明:
如果我们要配置单独app下的静态文件的话,在settings.py文件中定义 STATIC_URL 变量。
STATIC_URL = ‘/static/’
如果我们要配置整个project下的静态文件的话,在settings.py文件中定义 STATICFILES_DIRS 变量
原文链接:https://blog.csdn.net/qq_39551311/article/details/108384974
打开网址验证:http://127.0.0.1:8000/
设计前端页面和交互逻辑
页面制作
两个文本框组件:显示计算公式,显示计算结果
16个公式编辑按钮
两个逻辑按钮:清空文本框内容,执行公式计算。
container-fluid : 设置内容占满整个浏览器宽度,然后对界面元素进行适配布局。
input_show:自己定义的类,显示文本框样式
extendContent:将背景拉伸,否则在手机上浏览时背景会显示不全。
<div class="container-fluid">
        <div class="row">
            <div class="col-xs-1 col-sm-4"> </div>
            <div id="computer" class="col-xs-10 col-sm-6">
                <input type="text" id="txt_code" name="txt_code" value="" class="form-control input_show"
                    placeholder="公式计算" disabled />
                <input type="text" id="txt_result" name="txt_result" value="" class="form-control input_show"
                    placeholder="结果" disabled />
                <br />
                <div>
                    <button type="button" class="btn btn-default btn_num" onclick="fun_7()">
                        7</button>
                    <button type="button" class="btn btn-default btn_num" onclick="fun_8()">
                        8</button>
                    <button type="button" class="btn btn-default btn_num" onclick="fun_9()">
                        9</button>
                    <button type="button" class="btn btn-default btn_num" onclick="fun_div()">
                        ÷</button>
                    <br />
                    <button type="button" class="btn btn-default btn_num" onclick="fun_4()">
                        4</button>
                    <button type="button" class="btn btn-default btn_num" onclick="fun_5()">
                        5</button>
                    <button type="button" class="btn btn-default btn_num" onclick="fun_6()">
                        6</button>
                    <button type="button" class="btn btn-default btn_num" onclick="fun_mul()">
                        x</button>
                    <br />
                    <button type="button" class="btn btn-default btn_num" onclick="fun_1()">
                        1</button>
                    <button type="button" class="btn btn-default btn_num" onclick="fun_2()">
                        2</button>
                    <button type="button" class="btn btn-default btn_num" onclick="fun_3()">
                        3</button>
                    <button type="button" class="btn btn-default btn_num" onclick="fun_sub()">
                        -</button>
                    <br />
                    <button type="button" class="btn btn-default btn_num" onclick="fun_0()">
                        0</button>
                    <button type="button" class="btn btn-default btn_num" onclick="fun_00()">
                        00</button>
                    <button type="button" class="btn btn-default btn_num" onclick="fun_dot()">
                        .</button>
                    <button type="button" class="btn btn-default btn_num" onclick="fun_add()">
                        +</button>
                </div>
                <div>
                    <br />
                    <button type="button" class="btn btn-success btn-lg btn_clear" id="lgbut_clear"
                        onclick="fun_clear()">清空</button>
                    <button type="button" class="btn btn-primary btn-lg" id="lgbut_compute">
                        计算</button>
                </div>
            </div>
            <div class="col-xs-1 col-sm-2"> </div>
        </div>
    </div>
    <div class="extendContent"> </div>
编辑css文件夹中的style.css文件:
/* 设置整体的背景样式 */
body {
    background-image: url("../img/bg.jpg");
    background-position: center 0;
    background-repeat: no-repeat;
    background-attachment: fixed;
    background-size: cover;
    -webkit-background-size: cover;
    -o-background-size: cover;
    -moz-background-size: cover;
    -ms-background-size: cover;
}

/* 显示文本框样式进行设置 */
.input_show {
    margin-top: 35px;
    max-width: 280px;
    height: 35px;
}

/* 数字按钮样式进行设置 */
.btn_num {
    margin: 1px 1px 1px 1px;
    width: 60px;
}

/* 清空按钮样式进行设置 */
.btn_clear {
    margin-left: 40px;
    margin-right: 20px;
}

/* 用于将背景拉伸,否则在手机上浏览时背景会显示不全 */
.extendContent {
    height: 300px;
}
逻辑功能实现
编辑index.html中的javascipt代码:
   <script>
        var x = document.getElementById("txt_code");
        var y = document.getElementById("txt_result");

        function fun_7() {
            x.value += '7';
        }

        function fun_8() {
            x.value += '8';
        }

        function fun_9() {
            x.value += '9';
        }

        function fun_div() {
            x.value += '/';
        }

        function fun_4() {
            x.value += '4';
        }

        function fun_5() {
            x.value += '5';
        }

        function fun_6() {
            x.value += '6';
        }

        function fun_mul() {
            x.value += '*';
        }

        function fun_1() {
            x.value += '1';
        }

        function fun_2() {
            x.value += '2';
        }

        function fun_3() {
            x.value += '3';
        }

        function fun_sub() {
            x.value += '-';
        }

        function fun_0() {
            x.value += '0';
        }

        function fun_00() {
            x.value += '00';
        }

        function fun_dot() {
            x.value += '.';
        }

        function fun_add() {
            x.value += '+';
        }

        function fun_clear() {
            x.value = '';
            y.value = '';
        }
    </script>
Ajax传递数据
单击"计算”按钮,将"公式"中的数据通过Ajax发送给后端服务器,
同时能够接受后端服务器发回来的执行结果并显示在"结果"文本框中。
    <script>
        function ShowResult(data) {
            var y = document.getElementById('txt_result');
            y.value = data['result'];
        }
    </script>
    <script>
        $('#lgbut_compute').click(function () {
            $.ajax({
                url: '/compute/', // 调用django服务器计算公式
                type: 'POST',     // 请求类型
                data: {
                    'code': $('#txt_code').val() // 获取文本框中的公式
                },
                dataType: 'json',   // 期望获得的响应类型为json
                success: ShowResult // 在请求成功之后调用该回调函数输出结果
            })
        })
    </script>
开发后端计算模块
后端除了前面已经创建的首页home()函数,还需要处理前端发送过来的计算公式
由Python模块执行计算然后将计算结果以JSON字符串形式返回给前端。
(1) 库函数导入
(2) 视图处理函数
(3)公式计算函数
视图处理
app/views.py:
代码:
from django.shortcuts import render
import subprocess #引入子进程模块,以执行计算公式
from django.views.decorators.http import require_POST#引入require_POST获得后台服务器POST请求权限
from django.http import JsonResponse #引入JsonResponse,将计算结果封装成JSON字符串
from django.views.decorators.csrf import csrf_exempt  #用于规避csrf校验


# Create your views here.

def home(request):
    return render(request,'index.html')

def run_code(code):
    try:
        code = 'print(' + code + ')'
        #subprocess.check_output 用于执行脚本
        output = subprocess.check_output(['python', '-c', code],
                                         universal_newlines=True,
                                         stderr=subprocess.STDOUT,
                                         timeout=30)
    except subprocess.CalledProcessError as e:
        output = '公式输入有误'
    return output


@csrf_exempt
@require_POST
def compute(request):
    code = request.POST.get('code')
    result = run_code(code)
    return JsonResponse(data={'result': result})
路由配置
compute/urls.py:
from django.contrib import admin
from django.urls import path
from app.views import home,compute

urlpatterns = [
    path('admin/', admin.site.urls),
    path('',home,name='home'),
    path('compute/',compute,name='compute'),#添加针对公式计算compute的路由
]


