TensorFlow - 浅层神经网络
来自CloudWiki
本实验介绍浅层神经网络在 TensorFlow 上的实现,并使用模型处理 MNIST 数据集。
目录
简介
MNIST数据集介绍
- MNIST是一个手写阿拉伯数字的数据集。
- 其中包含有60000个已经标注了的训练集,还有10000个用于测试的测试集。
- 本次实验的任务就是通过手写数字的图片,识别出具体写的是0-9之中的哪个数字。
理论知识回顾
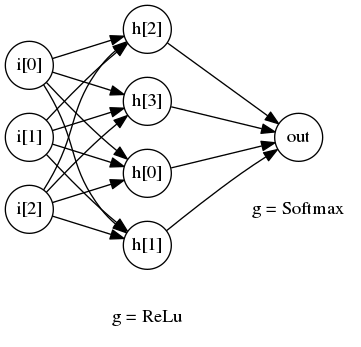
一个典型的浅层神经网络结构如下:
- 上图所示的是一个只有一层隐藏层的浅层神经网络
- 我们有3个输入层节点,分别对应i[1] i[2] i[3]
- 隐藏层有4个节点,分别对应h[0] h[1] h[2] h[3],对应的激活函数为ReLu函数
- 对于典型的二分类任务,我们只需要1个输出节点,就是out节点,对应的激活函数是softmax函数
激活函数定义(activation function):
ReLu(x)=max(0,x)
模型设计
- MNIST数据一共有784个输入,所以我们需要一个有784个节点的输入层。
- 对于中间层,我们设置为784个节点,使用的激活函数为ReLu
- MNIST数据使用One-Hot格式输出,有0-9 10个label,分别对应是否为数字0-9,所以我们在输出层有10个节点,由于0-9的概率是互斥的,我们使用 Softmax 函数作为该层的激活函数
数据准备
首先我们需要先下载MNIST的数据集。使用以下的命令进行下载:
wget https://devlab-1251520893.cos.ap-guangzhou.myqcloud.com/t10k-images-idx3-ubyte.gz
wget https://devlab-1251520893.cos.ap-guangzhou.myqcloud.com/t10k-labels-idx1-ubyte.gz
wget https://devlab-1251520893.cos.ap-guangzhou.myqcloud.com/train-images-idx3-ubyte.gz
wget https://devlab-1251520893.cos.ap-guangzhou.myqcloud.com/train-labels-idx1-ubyte.gz
训练模型
创建代码
创建文件shallow_neural_networks.py:
#!/usr/bin/python
# -*- coding: utf-8 -*-
import numpy as np
import tensorflow as tf
from tensorflow.examples.tutorials.mnist import input_data

if __name__ == "__main__":

    MNIST = input_data.read_data_sets("./", one_hot=True)
构建模型
如下代码构建了这么一个浅层网络:
源代码:
#!/usr/bin/python
# -*- coding: utf-8 -*-

import numpy as np
import tensorflow as tf
from tensorflow.examples.tutorials.mnist import input_data

#构建神经层的函数
#允许用户指定上一层的输出节点的个数作为input_size, 本层的节点个数作为output_size, 并指定激活函数activation_function 可以看到我们调用的时候位神经网络添加了隐藏层1和输出层
def add_layer(inputs, in_size, out_size, activation_function=None):
    W = tf.Variable(tf.random_normal([in_size, out_size]))
    b = tf.Variable(tf.zeros([1, out_size]) + 0.01)

    Z = tf.matmul(inputs, W) + b
    if activation_function is None:
        outputs = Z
    else:
        outputs = activation_function(Z)

    return outputs


if __name__ == "__main__":

    MNIST = input_data.read_data_sets("./", one_hot=True)

    learning_rate = 0.05#学习率
    batch_size = 128 # 每次样本的数量
    n_epochs = 10#训练次数?

    X = tf.placeholder(tf.float32, [batch_size, 784])#X表示手写数字的样本图片
    Y = tf.placeholder(tf.float32, [batch_size, 10])#Y表示给图片贴的标签

    l1 = add_layer(X, 784, 1000, activation_function=tf.nn.relu)# # 添加隐藏层1:输入为X,输入的大小为784,输出为1000,激活函数为relu
    prediction = add_layer(l1, 1000, 10, activation_function=None)#添加输出层
计算激活函数和损失函数
在刚才的代码下添加如下代码:
entropy = tf.nn.softmax_cross_entropy_with_logits(labels=Y, logits=prediction)
#这里的softmax可以看成是一个激励(activation)函数或者链接(link)函数,把我们定义的线性函数的输出转换成我们想要的格式,也就是关于10个数字类的概率分布。因此,给定一张图片,它对于每一个数字的吻合度可以被softmax函数转换成为一个概率值。
 loss = tf.reduce_mean(entropy)#计算交叉熵,也就是我们的损失函数,训练的目的是使这个损失函数的值最小
应用反向传播算法,优化损失函数
在刚才的代码下添加如下代码:
optimizer = tf.train.GradientDescentOptimizer(learning_rate).minimize(loss)#损失函数的优化器
编写会话主函数
在刚才的代码下添加如下代码:
init = tf.initialize_all_variables()#初始化所有变量

 with tf.Session() as sess:
        sess.run(init)

        n_batches = int(MNIST.train.num_examples/batch_size)#训练的总次数 =样本总数除以每次训练的样本数
        for i in range(n_epochs):
            for j in range(n_batches):
                X_batch, Y_batch = MNIST.train.next_batch(batch_size)
                _, loss_ = sess.run([optimizer, loss], feed_dict={X: X_batch, Y: Y_batch})
                if j == 0:
                    print "Loss of epochs[{0}] batch[{1}]: {2}".format(i, j, loss_)
执行代码
python shallow_neural_networks.py
测试模型
编辑代码
编辑源文件 shallow_neural_networks.py,
在with tf.Session() as sess中添加:
    # test the model
        n_batches = int(MNIST.test.num_examples/batch_size)#训练的总次数 =样本总数除以每次训练的样本数
        total_correct_preds = 0#总正确率
        for i in range(n_batches):#训练n_batches次
            X_batch, Y_batch = MNIST.test.next_batch(batch_size)#读取下一组样本
            preds = sess.run(prediction, feed_dict={X: X_batch, Y: Y_batch})
            correct_preds = tf.equal(tf.argmax(preds, 1), tf.argmax(Y_batch, 1))#评估预测值是否和真实值相等
            #tf.equal(A, B)是对比这两个矩阵或者向量的相等的元素,如果是相等的那就返回True,反正返回False
            accuracy = tf.reduce_sum(tf.cast(correct_preds, tf.float32))

            total_correct_preds += sess.run(accuracy)

        print "Accuracy {0}".format(total_correct_preds/MNIST.test.num_examples)#计算整体的准确率
执行代码
python shallow_neural_networks.py
输出:
Loss of epochs[0] batch[0]: 308.17565918
Loss of epochs[1] batch[0]: 14.9472503662
Loss of epochs[2] batch[0]: 1.9965672493
Loss of epochs[3] batch[0]: 5.2116689682
Loss of epochs[4] batch[0]: 2.28790950775
Loss of epochs[5] batch[0]: 3.53200340271
Loss of epochs[6] batch[0]: 1.16145336628
Loss of epochs[7] batch[0]: 2.30179715157
Loss of epochs[8] batch[0]: 0.442874521017
Loss of epochs[9] batch[0]: 2.31476974487
Accuracy 0.9445
可以看到经过10轮的训练,准确度大约在94%左右
参考文档:https://cloud.tencent.com/developer/labs/lab/10298
完整代码
shallow_neural_networks.py:
#!/usr/bin/python
# -*- coding: utf-8 -*-

import numpy as np
import tensorflow as tf
from tensorflow.examples.tutorials.mnist import input_data

def add_layer(inputs, in_size, out_size, activation_function=None):
    W = tf.Variable(tf.random_normal([in_size, out_size]))
    b = tf.Variable(tf.zeros([1, out_size]) + 0.01)

    Z = tf.matmul(inputs, W) + b
    if activation_function is None:
        outputs = Z
    else:
        outputs = activation_function(Z)

    return outputs


if __name__ == "__main__":

    MNIST = input_data.read_data_sets("./", one_hot=True)

    learning_rate = 0.05#学习率
    batch_size = 128 # 每次样本的数量
    n_epochs = 10#训练次数?

    X = tf.placeholder(tf.float32, [batch_size, 784])#X表示手写数字的样本图片
    Y = tf.placeholder(tf.float32, [batch_size, 10])#Y表示给图片贴的标签

    l1 = add_layer(X, 784, 1000, activation_function=tf.nn.relu)# # 添加隐藏层1:输入为X,输入的大小为784,输出为1000,激活函数为relu
    prediction = add_layer(l1, 1000, 10, activation_function=None)#添加输出层

    entropy = tf.nn.softmax_cross_entropy_with_logits(labels=Y, logits=prediction)
#这里的softmax可以看成是一个激励(activation)函数或者链接(link)函数,把我们定义的线性函数的输出转换成我们想要的格式,也就是关于10个数字类的概率分布。因此,给定一张图片,它对于每一个数字的吻合度可以被softmax函数转换成为一个概率值。
    loss = tf.reduce_mean(entropy)#计算交叉熵,也就是我们的损失函数,训练的目的是使这个损失函数的值最小

    optimizer = tf.train.GradientDescentOptimizer(learning_rate).minimize(loss)#损失函数的优化器

    init = tf.initialize_all_variables()#初始化所有变量

    with tf.Session() as sess:
        sess.run(init)

        n_batches = int(MNIST.train.num_examples/batch_size)#训练的总次数 =样本总数除以每次训练的样本数
        for i in range(n_epochs):
            for j in range(n_batches):
                X_batch, Y_batch = MNIST.train.next_batch(batch_size)
                _, loss_ = sess.run([optimizer, loss], feed_dict={X: X_batch, Y: Y_batch})
                if j == 0:
                    print "Loss of epochs[{0}] batch[{1}]: {2}".format(i, j, loss_)

        # test the model
        n_batches = int(MNIST.test.num_examples/batch_size)#训练的总次数 =样本总数除以每次训练的样本数
        total_correct_preds = 0#总正确率
        for i in range(n_batches):#训练n_batches次
            X_batch, Y_batch = MNIST.test.next_batch(batch_size)#读取下一组样本
            preds = sess.run(prediction, feed_dict={X: X_batch, Y: Y_batch})
            correct_preds = tf.equal(tf.argmax(preds, 1), tf.argmax(Y_batch, 1))#评估预测值是否和真实值相等
            #tf.equal(A, B)是对比这两个矩阵或者向量的相等的元素,如果是相等的那就返回True,反正返回False
            accuracy = tf.reduce_sum(tf.cast(correct_preds, tf.float32))

            total_correct_preds += sess.run(accuracy)

        print "Accuracy {0}".format(total_correct_preds/MNIST.test.num_examples)#计算整体的准确率
进阶版
进阶版:加入Dropout
为了防止过拟合,可以加入dropout函数。
有关此函数,在TensorFlow 高级函数有详细讲解,主要是为了防止过拟合。
源代码:
#!/usr/bin/python
# -*- coding: utf-8 -*-
from tensorflow.examples.tutorials.mnist import input_data
import tensorflow as tf

mnist = input_data.read_data_sets("", one_hot=True)  # 添加数据源地址

in_units = 784#ma:输入单元的个数
h1_units = 300#ma:隐藏层单元的个数

w1 = tf.Variable(tf.truncated_normal([in_units, h1_units], stddev=0.1))  # 补全参数初始化

b1 = tf.Variable(tf.zeros([h1_units]))  # 补全参数初始化
w2 = tf.Variable(tf.zeros([h1_units, 10]))  # 补全参数初始化
b2 = tf.Variable(tf.zeros([10]))  # 补全参数初始化

x = tf.placeholder(tf.float32, [None, in_units])  # 设置输入占位符
keep_prob = tf.placeholder(tf.float32)#Dropout比率,即保留节点的概率

hidden1 =  tf.nn.relu(tf.matmul(x, w1) + b1)  # 设置隐含层
hidden_drop1 = tf.nn.dropout(hidden1, keep_prob)  # 设置隐含层的Dropout

y = tf.nn.softmax(tf.matmul(hidden_drop1, w2) + b2)   # 输出层
y_ = tf.placeholder(tf.float32, [None, 10])#真实的标签值

#计算损失函数
cross_entropy = tf.reduce_mean(-tf.reduce_sum(y_ * tf.log(y), reduction_indices=[1]))  # 损失函数

#反向传播算法
train_step = tf.train.AdagradOptimizer(0.3).minimize(cross_entropy)

#开始会话
with tf.Session() as sess:
    tf.global_variables_initializer().run()
    for i in range(5000):#训练5000次
        batch_xs, batch_ys = mnist.train.next_batch(100)#每次取100个样本
        sess.run([y, train_step, cross_entropy], feed_dict={x: batch_xs, y_: batch_ys, keep_prob: 0.75})
    correct_prediction = tf.equal(tf.argmax(y, 1), tf.argmax(y_, 1))
    accuracy = tf.reduce_mean(tf.cast(correct_prediction, tf.float32))
    print(accuracy.eval({x: mnist.test.images, y_: mnist.test.labels, keep_prob: 1.0}))
输出结果:0.9841
参考文档:https://www.cnblogs.com/libinggen/p/7221264.html

