拜年小程序
来自CloudWiki
目录
顶部导航栏设置
window设置
在app.json中,
用于定义页面的背景颜色,字体样式,文字颜色等等。
- enablePullDownRefresh:设置是否进行下拉刷新
- backgroundColor: 设置下拉背景颜色,颜色为HEXcolor编码
- backgroundTextStyle:设置下拉进度条的颜色,它只有两种选择,一种是light,一种是dark
- navigationBarBackgroundColor:设置导航栏背景颜色,颜色为HEXcolor编码
- navigationBarTitleText:设置导航栏文本
- navigationBarTextStyle:设置导航栏文本颜色,一种是light,一种是dark
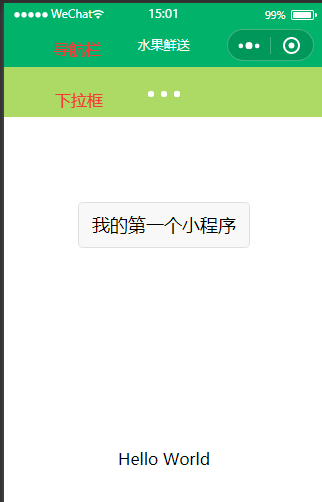
更改导航栏背景颜色及文本
   "navigationBarBackgroundColor": "#CB473B",
    "navigationBarTitleText": "虎年快乐",
    "navigationBarTextStyle":"black"
更改下拉框颜色
    "enablePullDownRefresh":true,
    "backgroundColor":"#FFB8BE"
    "backgroundTextStyle":"light",
更多设置将在以后的课中进行介绍
底部菜单栏tabBar
app.json文件中 进行底部菜单栏的配置
常用的配置项如下:
tabbar:
- color: 未选择时的颜色
- selectedColor:选中时的颜色
- borderStyle:底部导航边框的颜色
- backgroundColor:底部导航背景色
- list:导航配置数组
- pagePath:页面访问地址
- iconPath: 未选择时图片路径
- selectedIconPath: 选中时图片路径
- text:导航图表下方文字
app.json:
{
{
  "pages": [
    "pages/index/index",
    "pages/test/index",
    "pages/logs/logs"
  ],
  "window": {
    "backgroundTextStyle": "light",
    "navigationBarBackgroundColor": "#fff",
    "navigationBarTitleText": "Weixin",
    "navigationBarTextStyle": "black"
  },
  "tabBar": {
    "color": "#505050",
    "selectedColor": "#1296DB",
    "list":[
      {
      "text":"主页",
      "pagePath":"pages/index/index",
      "iconPath":"/images/invite.png",
      "selectedIconPath": "/images/invite.png"
      },
      {
        "text": "测试",
        "pagePath": "pages/test/index",
        "iconPath": "/images/marry.png",
        "selectedIconPath": "/images/marry.png"
      }
    ]
  },
  "style": "v2",
  "sitemapLocation": "sitemap.json",
  "lazyCodeLoading": "requiredComponents"
}
组件化开发
选学:
页面的渲染
知识:列表渲染与条件渲染
js:
  data: {
    num: [
      '/images/timg1.jpg',
      '/images/timg2.jpg',
      '/images/timg3.jpg',
      '/images/timg5.jpg',
      '/images/timg6.jpg',
      '/images/timg7.jpg',
      '/images/timg8.jpg',
      '/images/timg9.jpg',
      '/images/timg10.jpg',
    ],
    condition:true
  },
wxml:
不使用列表渲染:
<view>{{num[0]}}</view>
<view>{{num[1]}}</view>
<view>{{num[2]}}</view>
<view>{{num[3]}}</view>
<view>{{num[4]}}</view>
<view>{{num[5]}}</view>
<view>{{num[6]}}</view>
<view>{{num[7]}}</view>
<view>{{num[8]}}</view>
<view>{{num[9]}}</view>
<view>{{num[10]}}</view>
使用列表渲染:
<view wx:for="{{num}}" style="color:red">
     {{item}}
</view>
条件渲染:
<view wx:if="{{condition}}"> 当条件为真时显示此语句</view>
准备图片路径
picture.js:
  /**
   * 页面的初始数据
   */
  data: {
    imgUrls: [
      '/images/timg1.jpg',
      '/images/timg2.jpg',
      '/images/timg3.jpg',
      '/images/timg4.jpg'
    ]
  },
编写轮播代码
picture.wxml:
<swiper indicator-color="white" indicator-active-color="#ff4c91" indicator-dots autoplay interval="3500" duration="1000" vertical circular>
  <swiper-item wx:for="{{imgUrls}}" wx:key="*this">
    <image src="{{item}}" mode="aspectFill" />
  </swiper-item>
</swiper>
编写轮播样式
picture.wxss:
swiper {
  height: 100vh;
}

image {
  width: 100vw;
  height: 100vh;
}
效果图
背景音乐播放
背景音乐播放
除了第三章介绍的音频接口,
微信还提供了wx.getBackgroundAudioManager()
这种即使在小程序切入后台时,也可以继续播放。
app.json中添加如下配置:
 "requiredBackgroundModes": [
    "audio"
  ],
然后在pages/index/index.js文件中编写背景音频播放的代码:
bgm: null,
  music_url: 'https://downsc.chinaz.net/Files/DownLoad/sound1/201803/9825.mp3',
  music_coverImgUrl: 'http://localhost:3000/cover.jpg',
  /**
   * 生命周期函数--监听页面加载
   */
  onLoad: function (options) {
      // 创建getBackgroundAudioManager实例对象
      this.bgm = wx.getBackgroundAudioManager()
      // 音频标题
      this.bgm.title = '过年音乐'
      // 专辑名称
      this.bgm.epname = '虎年大吉'
      // 歌手名
      this.bgm.singer = 'singer'
      // 专辑封面
      this.bgm.coverImgUrl = this.music_coverImgUrl
      // this.bgm.onCanplay(() => {
      //   this.bgm.pause()
      // })
      // 指定音频的数据源
      this.bgm.src = this.music_url
      this.bgm.play()
  },
继续在index.js中编写代码,实现单击事件:
 // 播放器的单击事件
  play: function() {
    if (this.data.isPlayingMusic) {
      this.bgm.pause()
    } else {
      this.bgm.play()
    }
    this.setData({
      isPlayingMusic: !this.data.isPlayingMusic
    })
  },


