Django之自定义用户注册与登录功能
来自CloudWiki
目录
技术要点
1)自定义用户注册和登录界面;
2)使用MD5加密存储用户密码;
3)使用session保存用户登录信息。
前导课程
首先按照Django之使用SQLite数据库和Django之用户登录与登陆验证的介绍,
建立网站项目和必要的数据库、路由、视图、模板等文件。
操作步骤
添加数据模型
打开questions应用中的models.py,添加新的模型。
class Department(models.Model):
    id = models.AutoField(primary_key=True)
    name = models.CharField(max_length=30)
    def _str_(self):
        return self.name

class Students(models.Model):
    id = models.AutoField(primary_key=True)
    account = models.CharField('登录账户',max_length=50,unique=True)
    password =models.CharField('密码',max_length=100)
更新数据库结构
执行命令,更新数据库结构。
D:\teaching\python\实训\onLinePythonLearning>python manage.py makemigrations
Migrations for 'questions2':
  questions2\migrations\0002_department_students.py
    - Create model Department
    - Create model Students

D:\teaching\python\实训\onLinePythonLearning>python manage.py migrate
Operations to perform:
  Apply all migrations: admin, auth, contenttypes, questions2, sessions
Running migrations:
  Applying questions2.0002_department_students... OK
注册数据表
打开应用questions2的admin.py,注册上面创建的数据表
from django.contrib import admin

# Register your models here.

# Register your models here.
from .models import Question2,Department,Students
admin.site.register(Question2)
admin.site.register(Department)
admin.site.register(Students)
编写前台页面
在网站项目的templates文件夹创建用户注册的前台页面代码,文件名register.html。
<html>
<head>
<meta charset="utf-8" />
<style type="text/css">
#layer2{width:400px; height:auto; padding:30px; margin:30px auto 0; background:#ddf; border-radius:8px;}
h3{font-size:16pt; color:#a00; text-align:center;}
#login
  {
  width:70%;margin:0 auto;

  }

#login td
  {

    height:40px;

  }
#login .col1{ width:35%;text-align:center;  }
#login .col2{ text-align:center; }
#login .col3{ text-align:center; }
</style>
</head>
<body><div id="layer2">
<form  method="POST" action="/check/register/">
    {% csrf_token %} <!-- django自带的防跨站引用攻击功能 -->
    <table id="login">
        <h3>用户注册界面</h3>
        <tr>
            <td class="col1">用户名</td>
            <td class="col2"><input type="text" name="account" id="account" required="required" /></td>
        </tr>

        <tr>
            <td class="col1">密码</td>
            <td class="col2"><input type="password" name="pwd1" id="pwd1" required="required"/></td>
        </tr>
        <tr>
            <td class="col1">请确认密码</td>
            <td class="col2"><input type="password" name="pwd2" id="pwd2" required="required"/></td>
        </tr>
        <tr>
        <td colspan="2" class="col3"><input type="submit" value="  注册  " />  </td>

        </tr>
        <tr> <td colspan="2" >{%if msg%} <span>{{msg}}</span>{%endif%}</td></tr>
    </table>
</form>
</div>
</body>
</html>
修改view文件
打开questions2应用的views.py文件,添加下面的代码,增加用户注册的代码。
from .models import Question2,Students
import hashlib
def register(request):
    try:
        post = request.POST
        account = post.get('account')
        #在执行下句之前,最好先在http://127.0.0.1:8000/admin/questions3/为
        #Students增加一条记录
        if Students.objects.filter(account=account):
            return render(request, 'register.html',{'msg':'账号已存在'})

        password =  post.get('pwd1')
        p2 = post.get('pwd2')
        if password != p2:
            return render(request,'register.html',{'msg':'两次密码不一样'})
        password = hashlib.md5(password.encode()).hexdigest()#密码使用MD5加密存储
        s = Students(account=account,password=password)
        s.save()
        return render(request,'register.html',{'msg':'注册成功'})
        # return redirect('/check/login')#页面跳转
    except:
        return render(request,'register.html',{'msg':None})
添加路由
打开questions2应用的urls.py,添加路由。
from django.urls import path
from . import views

urlpatterns = [
        path('',views.index),
        path('login/',views.login),
        path('register/',views.register),
        ]
运行网站
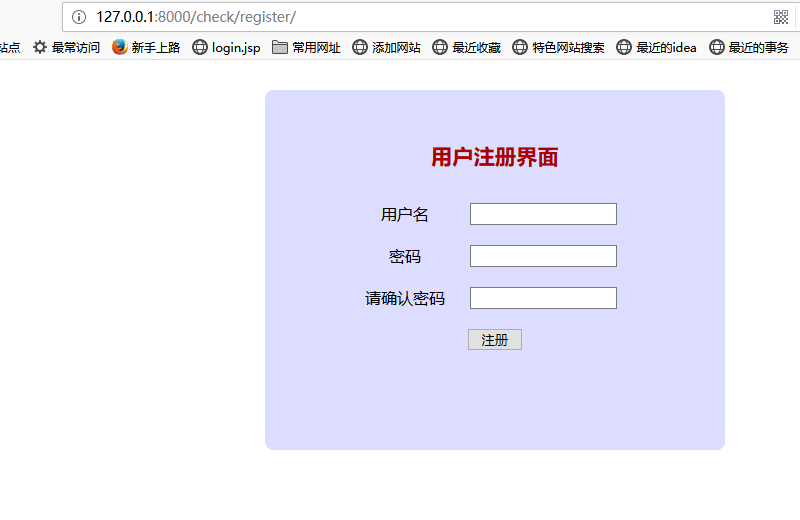
执行命令python manage.py runserver运行网站,使用浏览器打开网址http://127.0.0.1:8000/check/register/,填写用户信息,进行注册。
修改login函数
由于使用了自定义的用户表和注册功能,需要相应地修改用户登录功能的代码,打开questions2应用的views.py文件,修改login函数的代码。
def login(request):
    #退出登录
    request.session = {}
    try:
        #获取网页参数,用户名和密码
        account = request.POST['usr']
        password  = hashlib.md5(request.POST['pwd'].encode()).hexdigest()
        #验证用户名和密码
        users = Students.objects.filter(account=account,password=password)

        if users :
            #登陆成功后添加session信息
            request.session['account'] = account
            #页面跳转
            return redirect('/check/')
        else:
            return render(request,'login.html',{'msg':'用户名或密码不正确'})
修改index函数
由于自定义了用户注册和登录功能,需要修改index视图,使用session检查用户是否登录,打开questions应用的views.py文件,修改index函数。
def index(request):
    #if not request.session.get('account'):
        #return redirect('login/')

    htmlCode ='<table border="1px">'
    for row in Question3.objects.all():
        htmlCode +=('<tr><td>'+str(row.id)+'</td><td>'+
                    row.questionContent+'</td><td>A. '+
                    row.option_a+'</td><td>B. '+
                    row.option_b+'</td><td>C. '+
                    row.option_c+'</td><td>D. '+
                    row.option_d+'</td>')
    htmlCode +='</table>'

    return HttpResponse(htmlCode)
验证登录、注册功能
使用上面的功能,注册一个新用户,然后登录http://127.0.0.1:8000/check,自动跳转到题库页面,如Python+django网页设计入门(4):用户登录与登录验证中所描述。
